Dental floss threaders are a great way to help clean your teeth and floss at the same time. They make it easy to thread dental floss through your teeth and into the spaces between your braces.
Dental floss threaders are small, plastic devices that you can use to thread dental floss into the gaps in between your teeth. The end of the device has a ring on it, so you can slide it onto the end of your piece of dental floss and then slide it through the space in between your teeth. You can buy dental floss threaders in most drugstores or supermarkets, but you can also make them yourself with household materials that you already have around the house!
Read on to learn more about How To Use Dental Floss Threaders For Braces, Plackers Orthopick
How To Use Dental Floss Threaders For Braces
Cleaning and flossing your teeth when you have braces is vitally important to your smile and your health.
Flossing, or using wax-covered thread to clean between teeth, scrubs the hard-to-reach places that are easily missed by brushes, especially with brackets and wires in the way. Floss between each tooth once a day, and use a small interproximal brush to clean around the brackets and under the wires.
Don’t skip flossing, even if it takes more time with your braces. These flossing techniques may make the process faster and easier. No matter which method you choose, it’s important to floss regularly to prevent gum disease and tooth decay while braces are working to align your teeth for a more confident smile.
Traditional flossing
This tried-and-true flossing technique is a great way to clean food and plaque from between teeth, but for people with braces, it can be a bit tricky. Threading the floss around the brackets and wire takes time.
Plan to give yourself 10 to 15 minutes to floss your teeth if you use this method. The only tool you will need is waxed floss. Unwaxed floss can tear and become stuck in the metal brackets.
How to use traditional floss with braces
- Cut an 18- to 24-inch piece of floss.
- Thread the floss between the main wire and your teeth. It helps to be in front of a mirror so you can watch the thread to make sure it’s going where you’d like it to.
- Wrap the ends of the floss around your index fingers to make handling the floss easier.
- Gently press the floss between the two teeth, and slide the floss up and down along the sides of both teeth. If you’re doing the top teeth, make an upside-down U shape: Go up the side of one tooth to the gumline, and then go down the side of the other tooth.
- Remove the floss, and gently unthread it from behind the wire. Be careful to not pop the floss out of the tooth. You might accidentally knock the wire and pop it out of the bracket.
- Move to the next pair of teeth, and repeat the process.
Waterpik or oral irrigator
A Waterpik is a unique tool that uses a steady stream of water to clean between teeth and along the gumline. A water flosser costs about $50, but some models are more expensive. Because of how efficient the stream of water is at cleaning your mouth, you only need three to five minutes to floss with this device.
Some brands of Waterpiks offer special tips for orthodontia. These tapered tips are able to clean around brackets and between teeth more easily than standard tips.
How to floss with a Waterpik
- Fill the machine’s water reservoir with water. You can add mouthwash to the water for an antibacterial bonus. However, this isn’t necessary.
- Insert the tapered tip on the water flosser. Press to send water through the flosser to make sure it’s working correctly and that the water pressure is strong enough for you.
- Lean over the sink, and place the tip of the flosser in your mouth.
- Turn the water flosser on. Close your lips to keep water from splashing out of your mouth. Allow the water to drain out of your mouth while you’re flossing.
- Glide the water stream along the gumline and between each tooth.
If you want, you can gently brush the tooth and brackets to loosen up any food or debris.
Then, spray between the teeth and along the gumline again.
Repeat this process along the front and back of each tooth.
When you’re finished, empty the reservoir of water, and dry the flosser tip. Store in a closed container to protect the tip.
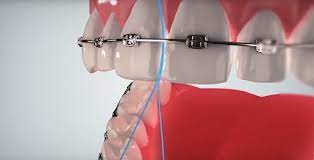
Floss threader
You can speed up the traditional flossing method with an inexpensive but indispensable tool. This small, plastic tool is called a floss threader. A floss threader helps you pull floss behind the braces wire easily.
Using a floss threader will shave several minutes off your dental care routine. You can buy floss threaders at supermarkets or pharmacies in the oral care section. Your orthodontist may also have sample threaders they can give you to try before buying a full bag.
How to use a floss threader to floss with braces
- Pull an 18- to 24-inch piece of waxed floss through the eye of the floss threader.
- Insert the point of the plastic needle under the wire of your braces. Gently pull the floss through the wire. Hold the floss threader in one hand.
- Wrap the floss around your index fingers to give you more control over the thin thread.
- Gently press the floss between the two teeth, and slide it up and down along the sides of both teeth. If you’re doing the top teeth, make an upside-down U shape: Go up the side of one tooth to the gumline, and then go down the side of the other tooth.
- Gently pull the floss out from between the teeth, and pull the floss out from behind the wire.
- Rethread the floss threader, and repeat the process on the next set of teeth.
Dental tape
For some people, traditional flossing can be painful. This is especially true for people who have not routinely flossed before getting braces. Unhealthy gums can bleed and feel swollen when you first start flossing them. Over time, the gums will be healthier, and flossing may no longer hurt.
While your gums are sensitive, consider flossing with dental tape. This ultrathin floss is smooth and spongy. It’s thinner than typical floss and also wider like a ribbon. That helps it glide between teeth more easily.
Use dental tape the same way you would traditional floss.
General tips and tricks for flossing with braces
In addition to regular flossing, these best practices are a good way to help you keep your pearly whites shining bright.
Schedule regular cleanings
Cleanings from a dental hygienist are a good idea while you have braces. They can deep clean around the brackets and hardware and help prevent staining. Consider scheduling a cleaning every three months.
Don’t use whitening toothpastes
While you might think keeping your teeth bright white is a good idea, brushing with whitening toothpastes could create problems later on. Whitening products can’t get under the brackets, so only exposed areas of your teeth will be whitened. Once the brackets are off, you may have off-white areas on each tooth.
Consider using an electric toothbrush
Electric toothbrushes clean betterTrusted Source than typical manual brushes, so you can get better results for less effort. Electric toothbrushes can cost $100 or more, but check with your dentist for a coupon or voucher.
0 seconds of 0 secondsVolume 0%
Takeaway
Braces can help create a confident smile. They can also reduce your chance of experiencing oral health problems in the future. However, taking care of your teeth while you have braces is vital for many reasons. Brushing and flossing help remove food and bacteria that can lead to staining and cavities. They can also prevent gingivitis and other oral health problems that can be problematic later in life.
Taking care of your teeth while you have braces may be time-consuming, but you’ll be thankful for the effort when the braces come off and your smile is beautiful and healthy.
Plackers Orthopick
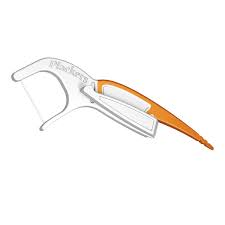
Plackers, makers of the first disposable dental flosser, expands its family-friendly line of oral healthcare products with Plackers OrthoPick, a dental flosser designed to make flossing easier and more convenient for millions with orthodontics such as braces, bridges and other dental appliances that make flossing difficult. To help these individuals more easily maintain their daily dental hygiene routine, Plackers is giving away free OrthoPick flosser samples
Plackers OrthoPick is designed specifically to meet the needs of those with orthodontics such as braces, bridges, permanent retainers and other dental appliances. The unique flosser design has a patented, thin flosser arm that fits easily between teeth and brace wire, offering an easier and more convenient alternative than floss threaders and other similar products that may be more time consuming. In addition, Plackers OrthoPick features an adjustable floss head to help users easily reach back teeth, a soft flexible pick to remove trapped food debris and a comfort grip that is easy to hold.
“Flossing regularly is one of the best ways to prevent chronic diseases such as tooth decay and gum disease – particularly while you’re investing in orthodontic treatments, ” said dentist and Associate Director, External Relations for Oral Health America (OHA) Anthony Stefanou, DMD. “Products like Plackers OrthoPick make it easier for those with braces, bridges and dental appliances to maintain regular flossing routines and help ensure a healthy mouth”
Plackers OrthoPick is the latest addition to the company’s complete flosser line that meets a variety of dental hygiene needs for the whole family.
“Maintaining one’s daily dental hygiene routine can be challenging for individuals with braces,” said Plackers’ Director of Marketing Tom Barman. “Plackers OrthoPick is designed to make flossing with braces and other dental appliances much easier, allowing individuals to help keep their teeth and gums healthy while undergoing orthodontic treatment.”
Those interested can sign up to receive one of the 10,000 free samples on Plackers’ website at http://www.plackers.com/FreeOrthoPick.
Plackers OrthoPick flossers are currently available at select retailers nationwide, or online at www.plackers.com.
About Plackers
Plackers, a leading brand of consumer oral care products, is a pioneer in dental flossers and other consumer oral care products. Having patented the first disposable dental flosser, Plackers is committed to developing high quality, affordable oral care products with innovative features that include a comprehensive line of dental flossers, dental accessories, and dental night guards including the Grind No More Dental Night Protector. Plackers holds over 20 patents and is sold in major retailers worldwide. For more information, visit http://www.plackers.com.
Best floss for braces

Flossing is an essential step in oral hygiene that most people overlook. In addition, it is crucial to maintain excellent oral hygiene while wearing braces to avoid developing white spots, cavities, and gum disease. It can be detrimental to your treatment if you do not adhere to proper oral hygiene, and in severe cases, your braces may need to be taken off sooner than you expected.
WHY IS FLOSSING IMPORTANT, ESPECIALLY WHEN YOU HAVE BRACES?
Braces create many hard-to-reach areas that are difficult to clean with dental floss alone. Food can get trapped between your teeth and under your braces, leading to plaque buildup and tooth decay. Another important reason for flossing is to remove food particles that become stuck in the brackets of your braces. This helps prevent cavities and dental diseases such as gingivitis. Gingivitis causes inflammation of the gums and leads to redness, swelling, bleeding during brushing or flossing, bad breath (halitosis), pain when chewing certain foods, discomfort when wearing dental appliances like orthodontic bands or bridges, etc.
RECOMMENDED TYPES OF DENTAL FLOSS FOR BRACES
#1: WAXED FLOSS
Waxed floss is made of thin filaments of plastic or Teflon coated in wax. The wax makes it easy to slip the floss between your teeth and glide against the surfaces you’re trying to clean. Waxed dental floss is recommended for those with braces, as it tends to slide better between closely-spaced teeth. Like dental super floss, you can use it around dental appliances for added cleaning ability.
#2: SUPER FLOSS
Super floss is a dental tape pre-threaded on a plastic, disposable wand with a dental tape-like tip on one end. It can be threaded along the inside of your teeth and around metal appliances such as braces or permanent retainers to aid in cleaning hard-to-reach places.
#3: FLOSS THREADER
A floss threader is made of two small loops attached to either end of a thin wire with a handle at the end. They allow you to floss between very tightly spaced teeth by threading dental floss through them.
#4: ORTHODONTIC FLOSSER
An orthodontic flosser looks like dental super floss with a handle. The handle allows you to place the dental floss against the wire of your dental appliance so that it won’t slip off while you are trying to clean your teeth.
#5: WATERPIK
A Waterpik is a dental appliance that shoots a pressurized jet of water between your teeth and under dental appliances. This helps remove food particles and dental plaque buildup, thus reducing the risk of dental disease such as gingivitis. In addition, some Waterpiks have attachments that move side to side or up and down along the wire of dental appliances for a more thorough dental cleaning.
To determine the best dental floss for braces, you need to consider how much space there is between your teeth and whether or not you wear dental appliances like orthodontic bands or retainers.
STEP-BY-STEP INSTRUCTIONS FOR FLOSSING WITH BRACES
With braces, flossing can be a little tricky and time-consuming at first, but the more you do it, the more efficient you will become!
Step One: Wrap dental floss around your middle fingers, leaving two inches between them. Use your thumbs and forefingers to guide the dental floss between your teeth.
Step Two: Gently slide dental floss up and down against one side of each tooth in a sawing motion until you reach the gum line. Do not snap the dental floss into place or force it in a back-and-forth motion along the teeth’ surfaces because this could damage the surface of your dental enamel.
Step Three: Repeat steps 1 & 2 on all sides of every tooth until you have flossed every space in your mouth that is visible with braces or dental appliances. If an area is difficult to reach with dental floss, you can opt for dental super floss or dental floss threaders.
Step Four: When finished with your dental flossing session, rinse the excess dental floss out in warm water and dispose of it properly in a waste receptacle.
Along with flossing, we recommend using an electronic toothbrush and visiting your dentist at least every six months for a checkup and cleaning.